You drew your face right. The proportion of the body is alright. You just got everything right. BUT…WAIT A MINUTE. The hands look like chicken feet. Now, they are eye-catching because they are just too awful. They totally ruin your drawing after dedicating your time drawing this art.
The human body is a complex construction because of how the bones and muscles combined together. Rest assured that we are not going to teach you the inside of the hands like bones, tendon, tissue in order to draw a hand at this moment. If you really want to know it, you can check this ( How to draw hands) blog out. You will be amazed by how they form. It’s more advanced than this tutorial.
In this tutorial, we will just need some construction lines to help us draw it. This tutorial only talks about the basis of drawing a hand. Remember, when we draw, we have to pay attention to the angles and proportion. To get the mind-blowing realistic result, we need to learn how to draw the texture which we will discuss it in the future.
Things you need and recommendation:
- Basic Graphite Pencils: 3H, HB, B, 4B, 6B (L’eoil The Eye Sketching Pencil Set)
- White Charcoal Highlight Pencil (Koh-I-Noor Gradational Extra White Coal in Pencil 8812)
- Toned Sketching Paper (Strathmore 400 Series Toned Sketch)
Step 1: Draw the Construction Lines
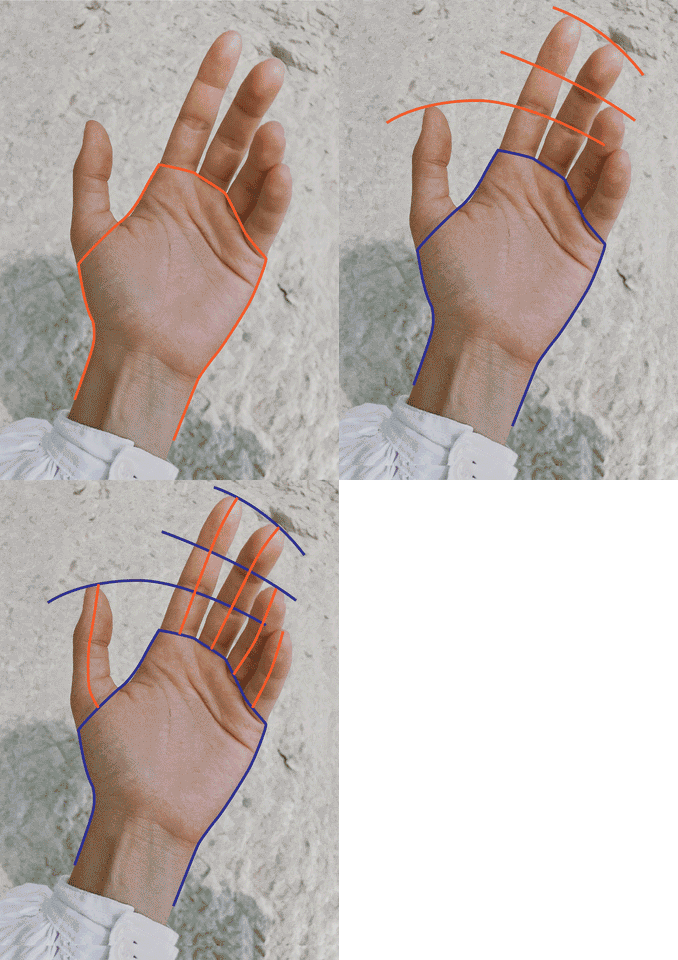
Construction lines are the linework used for positioning the objects in the right proportion. The lines are not restricted just the straight lines. They also can be curve lines. Different length can be viewed as different angles of the objects. It’s crucial for beginners as they are not familiar with the perspectives when they begin drawing.
Know more from this Youtube video (How to draw construction lines)

To draw the construction lines of the hand, we simply try to outline the palm. It is to estimate how big your hand to begin with. It’s needless to make it too perfect or detailed. What important is to measure well the distance of each finger so you can draw easily on the next step.
Hand photo reference by Daria Shevtsova
Where else to draw? We also draw the curve lines on every knuckle of the fingers to express the flow and movement of the fingers. Then, you can draw the lines in the middle of each finger. You should be aware of the length of the lines and how the lines placed because it might affect the angles of the fingers.
Step 2: Outline All the Hand
When you finished all the construction lines, you can outline the hand. The fingers are more rounded off at the ends. The view of the thumb is different than the rest of the fingers. It is a bit pointy towards the nail. Once you draw the knuckles of the fingers, you should pay particularly close attention to them. They are not all the straight lines. You need to draw inwardly a bit on the joints or sometimes outwardly.

It’s fairly important to create the shape of the hands. You want to make it naturally of the movement. For example, as the fingers are closer to your view, you should draw them thicker.
Step 3: Shading and Highlighting
Shading and Highlighting are the twins to get the 3D look and make your drawing come to life. Slowly add up the graphite from the lightest grades to the darkest grades on the shadow. Leave room or space for the highlight. Highlights are the areas where the sun or light hit in.


Keep Learning
This technique you’ve learned would help you get the simple method to draw a hand nicely. Nothing can be done perfectly at the beginning and do not afraid of the mistakes.
Check out Youtube video below to learn and share your result with us @loeilart or #loeilart.
How to Draw a Hand for Beginners Time-lapse


https://triberr.com/Company11
https://www.hackerearth.com/leen1362023/ https://www.noteflight.com/profile/d01b0aa45483c6a4ecfe8cf31fecd8c33c3f22a4 https://mastodon.social/Yanbu
https://spinninrecords.com/profile
https://www.designspiration.com/leen1362023/saves/
https://myanimelist.net/profile/Yanbu
https://www.producthunt.com/@company111
https://hub.docker.com/u/yanbu11?gl=1*1wb44oo*_ga*Mzc5ODI2MC4xNzQ2MjY4NzYz*_ga_XJWPQMJYHQ*czE3NDYyNjg3NjIkbzEkZzEkdDE3NDYyNjg5NjckajYkbDAkaDA.
https://www.custommagnums.com/members/yanbu.172085/
https://sketchfab.com/Yanbu
https://www.ezistreet.com/profile/yanbu/about
https://therabbitroom.kindful.com/dashboard
https://www.wonderhowto.com/settings/personal/
https://www.warriorforum.com/members/Yanbu.html?utm_source=internal&utm_medium=user-menu&utmcampaign=user-profile
https://www.behance.net/yanbucompany
https://qiita.com/Yanbu11
شركة الصقر الدولي ارخص شركات نقل عفش on
https://github.com/eleqian/WiDSO/issues/2
https://github.com/NJU-ProjectN/ics2015/issues/16
https://github.com/Aniverse/A/issues/49
https://papaly.com/categories/share?id=130d1b872d214bd39b30a9d1e24f91d0
https://papaly.com/johnsmith96/84HbY/DiamondSeo274
https://pastebin.com/6KaC9UJK
https://etextpad.com/ybpzareg6g
https://paste.ee/p/WLfb81zq
https://ideone.com/Gt2pMj
https://pastelink.net/hpd79igh
https://rentry.co/pdidckze
https://papaly.com/categories/share?id=173844d74bd9482d97189bd777bbdd18
https://papaly.com/categories/share?id=3e213c24d5aa4870b8fcd3865e5a9a55
https://pastebin.com/h2SAnsgs
https://etextpad.com/jgfpxbybzm
https://paste.ee/p/Jxaqivv2
https://ideone.com/IZhYQa
https://pastelink.net/k5kd1glw
https://paste2.org/cXkXJkyc
https://glot.io/snippets/h6p2j8vd9g
https://github.com/fsprojects/FSharp.Formatting/issues/955
https://github.com/etexteditor/e/issues/94
kaina3333 on
https://www.atar-almadinah.com/%D8%B4%D8%B1%D9%83%D8%A9-%D8%AA%D8%AE%D8%B2%D9%8A%D9%86-%D8%B9%D9%81%D8%B4-%D8%A8%D8%A7%D8%A8%D9%87%D8%A7.html
https://www.atar-almadinah.com/%D8%B4%D8%B1%D9%83%D8%A9-%D8%AA%D8%BA%D9%84%D9%8A%D9%81-%D8%A7%D9%84%D8%B9%D9%81%D8%B4-%D8%A8%D8%A7%D8%A8%D9%87%D8%A7.html
https://www.atar-almadinah.com/%D8%B4%D8%B1%D9%83%D8%A9-%D8%AA%D8%BA%D9%84%D9%8A%D9%81-%D8%A7%D8%AB%D8%A7%D8%AB-%D8%A8%D8%A7%D9%84%D8%B1%D9%8A%D8%A7%D8%B6.html
https://www.atar-almadinah.com/%D8%B4%D8%B1%D9%83%D8%A9-%D8%A7%D9%84%D8%B5%D9%81%D8%B1%D8%A7%D8%AA-%D9%84%D9%86%D9%82%D9%84-%D8%A7%D9%84%D8%B9%D9%81%D8%B4-%D8%A8%D8%A7%D9%84%D8%B1%D9%8A%D8%A7%D8%B6.html
https://www.atar-almadinah.com/%D8%B4%D8%B1%D9%83%D8%A9-%D9%86%D9%82%D9%84-%D8%B9%D9%81%D8%B4-%D8%A8%D8%A7%D8%AD%D8%AF-%D8%B1%D9%81%D9%8A%D8%AF%D8%A9.html
https://www.atar-almadinah.com/%D8%A7%D8%B1%D8%AE%D8%B5-%D8%B4%D8%B1%D9%83%D8%A7%D8%AA-%D9%86%D9%82%D9%84-%D8%B9%D9%81%D8%B4-%D8%A8%D9%8A%D9%86-%D8%A7%D9%84%D9%85%D8%AF%D9%86.html
شركة الصقر الدولي ارخص شركات نقل عفش on