
I beg you agree that foil can enhance every boring item to the next level of luxury. It’s common to see some notebooks, cards, and posters with some foil on top of it. (We also use foil to customize and stamp your name on our pencils and more) What if you can seal everything with gold, including your artwork.
There are lots of ways you can do it. In this article, we will talk about 3 trending ways to add gold foil.
1.Foil with Glue
This method is good for applying to small areas, like a specific place on your artwork. Since the areas are quite small and particular, I found some very cool glues which help you get your art done. They are Kuretake Colored 2-way glue pens. They provide different tip sizes. One is as small as a pen. The color of the glue is light blue but it turns normal when it is oxidized. What's more, the stickiness is promising. You can even make some glitter calligraphy art with them.

If the area is big, you can try to spray the area with Elmers's adhesive spray glue.


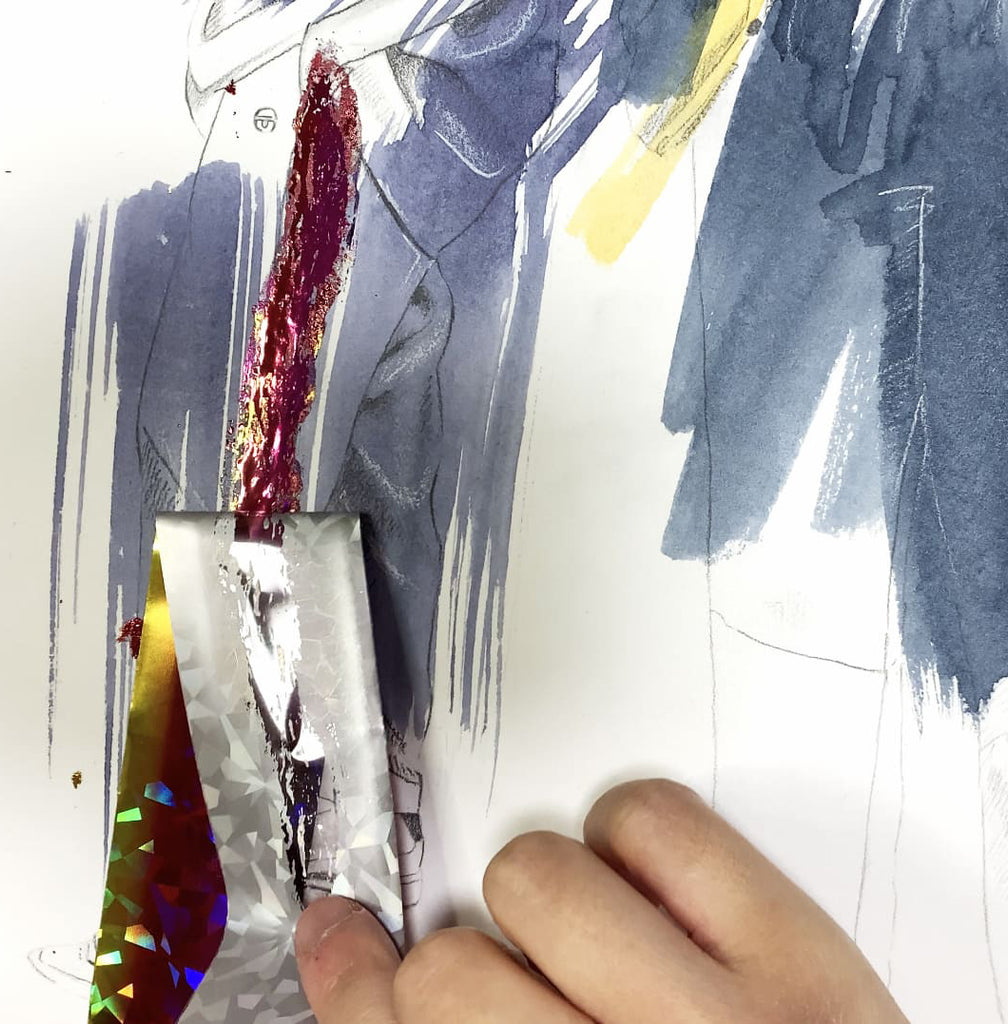
Trim the foil and place the foil face up over the glue.

Since the foil is so fragile, I don’t recommend using anything objects to smoothen it. It will only damage it. I made my mistake when I use it on my artwork. Then I do some trial on paper. I found that the best result is not to touch it after you place the foil in place until the glue is dry. You can slightly press the areas though. If you’re not sure whether it’s dry, just wait for hours. I also found that liquid glue works better than a solid glue stick. Finally, peel the foil off slowly. Oh my, isn’t it beautiful? I feel so excited to see the result.
Some tips when you use glue:
- Don’t use anything trying to smoothen the foil. You can press the areas a bit. Because when the surface is wet, the paper and foil are very fragile. Then, you will destroy them both.
- Be patient. Just let it dry totally. The best result will show, and you will be amazed by it.

2. Foil Your Prints with a Laminator
This method is best for art prints. You may see lots of artists on Instagram layering gold or metallic foil over their original prints.
You may require some tools and machines to get the outcome done.
- Laminator
- Foil
- A Laser printer (It won’t work with an ink-jet printer.)
The foil comes off in 2 ways. One is using heat, and another is using glue. When the areas are printed by a laser printer, the areas will get warm so that the foil will stick onto the prints.
Step 1: Print your prints in a monograms tone with a laser printer. Meanwhile, let the laminator heat up until it’s ready.
Step 2: Cut out the foil and cover the image entirely with the color upwards.
Step 3: Feed your print and foil together through the laminator.
Step 4: When it’s cool down, you can gently peel back the foil! Viola!!
If you are looking for a laminator, you can buy one produced by Amazon. The machine handles paper up to 9 inches wide. You can also change the heat setting for different thicknesses.

3. Personalize your Notebooks, Cards and more with a Hot Stamping Machine
This method is also using heat. For this method, you may need a hot stamping machine and a mold with your customized logo or even some fonts.
It sounds like hefty spending on doing this foil art. However, if you want to give a card, letter, or even a note with your personalized name logo to your besties. It can go a long way.
Imagine that it’s an excitement when the receiver got your gift with your logo stamp with foil on top, right?
Making your foil art is REAL fun. To exhilarate your work of art, we have lots of options on foil that you can put on your cart.
Try this with us and tag your results on our social media networks.
شركة سكاي لخدمات نقل العفش والاثاث بالمنطقة العربية السعودية نحن نوفر خدمات نقل اثاث بالرياض ونقل عفش بالمدينة المنورة ونقل عفش بمكة ونقل عفش بالطائف نحن نقدم افضل نقل اثاث بخميس مشيط ونقل عفش بجدة
https://treeads.net/ شركة سكاي نقل العفش
https://treeads.net/blog.html مدونة لنقل العفش
https://treeads.net/movers-mecca.html شركة نقل عفش بمكة
https://treeads.net/movers-riyadh-company.html شركة نقل عفش بالرياض
https://treeads.net/all-movers-madina.html شركة نقل عفش بالمدينة المنورة
https://treeads.net/movers-jeddah-company.html شركة نقل عفش بجدة
https://treeads.net/movers-taif.html شركة نقل عفش بالطائف
https://treeads.net/movers-dammam-company.html شركة نقل عفش بالدمام
https://treeads.net/movers-qatif.html شركة نقل عفش بالقطيف
https://treeads.net/movers-jubail.html شركة نقل عفش بالجبيل
https://treeads.net/movers-khobar.html شركة نقل عفش بالخبر
https://treeads.net/movers-ahsa.html شركة نقل عفش بالاحساء
شركة نقل عفش بالخبر on
شركة كيان لنقل العفش بالرياض والمدينة المنورة وجدة ومكة والطائف والدمام تقديم لكم دليل كامل لشركات نقل العفش بالمملكة العربية السعودية
https://mycanadafitness.com/ شركة كيان لنقل العفش
https://mycanadafitness.com/forum.html منتدي نقل العفش
https://mycanadafitness.com/movingfurnitureriyadh.html شركة نقل اثاث بالرياض
https://mycanadafitness.com/movingfurniturejaddah.html شركة نقل اثاث بجدة
https://mycanadafitness.com/movingfurnituremecca.html شركة نقل اثاث بمكة
https://mycanadafitness.com/movingfurnituretaif.html شركة نقل اثاث بالطائف
https://mycanadafitness.com/movingfurnituremadina.html شركة نقل اثاث بالمدينة المنورة
https://mycanadafitness.com/movingfurnituredammam.html شركة نقل اثاث بالدمام
https://mycanadafitness.com/movingfurniturekhobar.html شركة نقل اثاث بالخبر
https://mycanadafitness.com/movingfurnituredhahran.html شركة نقل اثاث بالظهران
https://mycanadafitness.com/movingfurniturejubail.html شركة نقل اثاث بالجبيل
https://mycanadafitness.com/movingfurnitureqatif.html شركة نقل اثاث بالقطيف
https://mycanadafitness.com/movingfurnitureahsa.html شركة نقل اثاث بالاحساء
https://mycanadafitness.com/movingfurniturekharj.html شركة نقل اثاث بالخرج
شركة كيان لنقل العفش on
https://sakr-eg.jimdosite.com/blog/shrk-nql-aafsh-bmk/
https://emc-mee.jimdosite.com/blog/moving-furniture-abha/
https://emc-mee.jimdosite.com/
https://emc-mee.jimdosite.com/blog/cleaning-jeddah/
https://emc-mee.jimdosite.com/my-services/
https://www.sbnation.com/users/mycanadafitness
https://sakr-eg.jimdosite.com/moving-furniture-jeddah/
https://seg7544.wixsite.com/my-site-1/post/%D8%B4%D8%B1%D9%83%D8%A9-%D9%86%D9%82%D9%84-%D9%88%D8%AA%D8%BA%D9%84%D9%8A%D9%81-%D8%B9%D9%81%D8%B4-%D8%A8%D8%A7%D8%A8%D9%87%D8%A7
https://seg7544.wixsite.com/my-site-1
https://companyservice33.weebly.com/blog1/8069015
https://companyservice33.weebly.com/blog1/1275122
https://companyservice33.weebly.com/blog1
شركات نقل عفش واثاث بجدة on
https://emc-mee.com/transfer-furniture-alkharj.html شركة نقل عفش بالخرج
https://emc-mee.com/transfer-furniture-buraydah.html شركة نقل عفش ببريدة
https://emc-mee.com/transfer-furniture-khamis-mushait.html شركة نقل عفش بخميس مشيط
https://emc-mee.com/transfer-furniture-qassim.html شركة نقل عفش بالقصيم
https://emc-mee.com/transfer-furniture-tabuk.html شركة نقل عفش بتبوك
https://emc-mee.com/transfer-furniture-abha.html شركة نقل عفش بابها
https://emc-mee.com/transfer-furniture-najran.html شركة نقل عفش بنجران
https://emc-mee.com/transfer-furniture-hail.html شركة نقل عفش بحائل
https://emc-mee.com/transfer-furniture-dhahran.html شركة نقل عفش بالظهران
https://emc-mee.com/transfer-furniture-kuwait.html شركة نقل عفش بالكويت
https://emc-mee.com/price-transfer-furniture-in-khamis-mushit.html اسعار شركات نقل عفش بخميس مشيط
https://emc-mee.com/numbers-company-transfer-furniture-in-khamis-mushit.html ارقام شركات نقل عفش بخميس مشيط
https://emc-mee.com/new-company-transfer-furniture-in-khamis-mushit.html شركة نقل عفش بخميس مشيط جديدة
https://emc-mee.com/transfer-furniture-from-khamis-to-riyadh.html شركة نقل عفش من خميس مشيط الي الرياض
https://emc-mee.com/transfer-furniture-from-khamis-mushait-to-mecca.html شركة نقل عفش من خميس مشيط الي مكة
شركات نقل عفش واثاث بجدة on
شركة مكافحة حشرات بالجبيل وكذلك شركة كشف تسربات المياه بالجبيل وتنظيف خزانات وتنظيف الموكيت والسجاد والكنب والشقق والمنازل بالجبيل وتنظيف الخزانات بالجبيل وتنظيف المساجد بالجبيل شركة تنظيف بالجبيل تنظيف المسابح بالجبيل
https://jumperads.com/jubail/anti-insects-company-jubail.html شركة مكافحة حشرات بالجبيل
https://jumperads.com/jubail/water-leaks-detection-company-jubail.html شركة كشف تسربات بالجبيل
https://jumperads.com/jubail/jubail-company-surfaces.html شركة عزل اسطح بالجبيل
https://jumperads.com/jubail/jubail-company-sewage.html شركة تسليك مجاري بالجبيل
https://jumperads.com/jubail/jubail-cleaning-company-sofa.html شركة تنظيف كنب بالجبيل
https://jumperads.com/jubail/jubail-cleaning-company-mosques.html شركة تنظيف مساجد بالجبيل
https://jumperads.com/jubail/jubail-cleaning-company-Carpet.html شركة تنظيف سجاد بالجبيل
https://jumperads.com/jubail/jubail-cleaning-company-tanks.html شركة تنظيف خزانات بالجبيل
https://jumperads.com/jubail/jubail-cleaning-company-swimming-bath.html شركة تنظيف وصيانة مسابح بالجبيل
https://jumperads.com/jubail/jubail-cleaning-company-Furniture.html شركة تنظيف الاثاث بالجبيل
https://jumperads.com/jubail/jubail-cleaning-company-home.html شركة تنظيف شقق بالجبيل
https://jumperads.com/jubail/jubail-cleaning-company-Carpets.html شركة تنظيف موكيت بالجبيل
https://jumperads.com/jubail/jubail-cleaning-company.html شركة تنظيف مجالس بالجبيل
https://jumperads.com/jubail/jubail-cleaning-company-house.html شركة تنظيف منازل بالجبيل
https://jumperads.com/jubail/jubail-cleaning-company-curtains.html شركة تنظيف ستائر بالجبيل
https://jumperads.com/jubail/jubail-cleaning-company-Villas.html شركة تنظيف فلل بالجبيل
https://jumperads.com/jubail/jubail-company-tile.html شركة جلي بلاط بالجبيل
شركة تنظيف منازل بالجبيل on
https://www.atar-almadinah.com/%D8%B4%D8%B1%D9%83%D8%A9-%D8%AA%D8%AE%D8%B2%D9%8A%D9%86-%D8%B9%D9%81%D8%B4-%D8%A8%D8%A7%D8%A8%D9%87%D8%A7.html
https://www.atar-almadinah.com/%D8%B4%D8%B1%D9%83%D8%A9-%D8%AA%D8%BA%D9%84%D9%8A%D9%81-%D8%A7%D9%84%D8%B9%D9%81%D8%B4-%D8%A8%D8%A7%D8%A8%D9%87%D8%A7.html
https://www.atar-almadinah.com/%D8%B4%D8%B1%D9%83%D8%A9-%D8%AA%D8%BA%D9%84%D9%8A%D9%81-%D8%A7%D8%AB%D8%A7%D8%AB-%D8%A8%D8%A7%D9%84%D8%B1%D9%8A%D8%A7%D8%B6.html
https://www.atar-almadinah.com/%D8%B4%D8%B1%D9%83%D8%A9-%D8%A7%D9%84%D8%B5%D9%81%D8%B1%D8%A7%D8%AA-%D9%84%D9%86%D9%82%D9%84-%D8%A7%D9%84%D8%B9%D9%81%D8%B4-%D8%A8%D8%A7%D9%84%D8%B1%D9%8A%D8%A7%D8%B6.html
https://www.atar-almadinah.com/%D8%B4%D8%B1%D9%83%D8%A9-%D9%86%D9%82%D9%84-%D8%B9%D9%81%D8%B4-%D8%A8%D8%A7%D8%AD%D8%AF-%D8%B1%D9%81%D9%8A%D8%AF%D8%A9.html
https://www.atar-almadinah.com/%D8%A7%D8%B1%D8%AE%D8%B5-%D8%B4%D8%B1%D9%83%D8%A7%D8%AA-%D9%86%D9%82%D9%84-%D8%B9%D9%81%D8%B4-%D8%A8%D9%8A%D9%86-%D8%A7%D9%84%D9%85%D8%AF%D9%86.html
شركة الصقر الدولي ارخص شركات نقل عفش on
https://triberr.com/Company11
https://www.hackerearth.com/leen1362023/ https://www.noteflight.com/profile/d01b0aa45483c6a4ecfe8cf31fecd8c33c3f22a4 https://mastodon.social/Yanbu
https://spinninrecords.com/profile
https://www.designspiration.com/leen1362023/saves/
https://myanimelist.net/profile/Yanbu
https://www.producthunt.com/@company111
https://hub.docker.com/u/yanbu11?gl=1*1wb44oo*_ga*Mzc5ODI2MC4xNzQ2MjY4NzYz*_ga_XJWPQMJYHQ*czE3NDYyNjg3NjIkbzEkZzEkdDE3NDYyNjg5NjckajYkbDAkaDA.
https://www.custommagnums.com/members/yanbu.172085/
https://sketchfab.com/Yanbu
https://www.ezistreet.com/profile/yanbu/about
https://therabbitroom.kindful.com/dashboard
https://www.wonderhowto.com/settings/personal/
https://www.warriorforum.com/members/Yanbu.html?utm_source=internal&utm_medium=user-menu&utmcampaign=user-profile
https://www.behance.net/yanbucompany
https://qiita.com/Yanbu11
شركة الصقر الدولي ارخص شركات نقل عفش on